
Want to start your own blog but don’t know how?
I have written this step by step detailed guide to help you start your own blog on WordPress using Hostinger.
Starting your blog could be life changing and I say this from my experience. Blogging is a very profitable and legit business idea which does not require huge investment.
I started my first blog in 2018 and now have multiple successful blogs which help me earn money online.

I share my blog income report for this blog as I want to inspire my readers and help them in starting their own blog.
I have also shared the tools I use to make money from my blog at the end of this post.
You can read the income report for this blog and know exactly how I make money blogging.
Starting my own blog was one of the best decisions of my life as it helped me open my mind to new doors of opportunity apart from getting a traditional 9 to 5 job.
( Disclosure: This post may contain affiliate links. We may receive commission if you purchase something from our links, without any extra charges from you. Please read the disclaimer for more information. )
What is a Blog & Why Should You Start Your Own Blog?
Before anything else, you should know what is a blog. Blog is a form of website that is updated with content (articles) frequently. These articles are about a specific topic or cover various diverse topics.
The topic of your blog or the category on which you write about is called the “Niche” of your blog.
You can choose from various niches: parenting, lifestyle, fashion, travel, finance etc.
Some people start a blog as an outlet so showcase their writing skills or to fulfill their hobbies of writing. But few people know that blogging can be done to earn money.
Yes, your blog can help you make money and this is exactly why I am writing this guide to help you start your money making blog.
Please make sure you join my free blogging course below ( I share blogging tips and secrets from my 3+ years of blogging and making money from my blogs!)

How to Start Your Blog: Step By Step Guide
The next few sections will show you the exact steps to start your own blog in less than 20 minutes.
I have made sure to include everything while keeping the process simple because starting your own blog could feel a bit complicated (especially if you are new to the world of online business and blogging)
Don’t worry, I have got you covered! Just read and follow the steps and you’ll have your blog up and running in the next few minutes.
Step 1: Choose Your Niche
The first step is to think about what topics you will be writing about on your blog. You can choose a single topic or multiple.
Having a niche is good and recommended because this helps in building authority and your readers believe that you are the expert in the topic you are writing about.
Their are many blogging niches which are profitable and popular:
- Travel
- Fitness
- Food & Cooking
- Fashion
- Beauty & Makeup
- Personal Finance
- Parenting
If you can’t decide a specific blogging niche write now, it’s alright. You don’t have to stress about this.
You can simply write about different topics you like, and once you gain readers for your blog, you can narrow down your niche depending on what your audience likes to read on your blog.
Step 2: Choose Your Blog Name (Domain Name)
This is such an exciting step!
Now you have to pick a name for your blog. Domain name is your blog’s name that people will type so that they can reach your blog.
For eg, my blog is “fitnstylish.com” which is the domain name or blog name that my reader’s type to find my blog.
Here are some useful tips that will help you in choosing your blog name:
- Pick a name with the extension “.com” as this is universal and people are more likely to remember as it’s a standard domain name ending. It will also make your blog look professional.
- Keep it simple and easy to spell. You don’t want to pick a name that is hard to recall or spell.
- Short names are attractive. Use a maximum of 2 or 3 words in your domain name.
- Avoid miss-spelling words as these will confuse the readers.
- You can add words related to your niche. For example if you want to start a cooking blog, you can add the words cooking or eating or kitchen to your domain name.
- Avoid using numbers, hyphen or symbols as these are hard to remember.
- Don’t complicate the domain name. If you can’t find any good name, you can even use your name as your blog name.
Time for action:
Write all the names that come to your mind on a paper. This list will be useful when you’ll try to register for your blog name as sometimes, your chosen blog name might already be taken.
So you will need to think about something else. Having a handy list of names would be good as you’ll have options to choose from.
Step 3: Register Your Domain & Hosting
When you start a blog, it’s best to go with a self hosted blog. This means that you will own all the content of your blog and it cannot be taken down or removed by anyone.
If you start your blog on a free platform like blogger or blogspot or wordpress.com, then you will always face the risk of your blog getting removed or shut down due to some or other issue.
Also, if you run a blog on these free platforms, you do not own the content that you have written, simply because you are using their service to host your blog.
This is why I always recommend my readers to start a self hosted WordPress blog. For this you will have to choose a webhost service.
I use Hostinger for hosting all my blogs and I would highly recommend it because they are one of the best providers out their with super affordable packages.
Here are the top reasons why I love their service so much:
- They have one of the most affordable web hosting service in the world.
- They offer amazing site speed which does not slow downs the blog and it loads very quickly. This means readers will stay on your blog for longer and increase your chance of earning more.
- The support team at hostinger is simply amazing. They have always helped solve any blog issues. It’s almost as if I have a technical team that will help me related to blog hosting issues.
- You will get a Free Domain & SSL Certificate when you purchase their hosting plan. this means you can cut the expense of buying domain separately.
- Many successful bloggers who run money making blogs, use and trust Hostinger.
Hostinger has offered super affordable packages for my readers at $ 2.19 a month, along with Free Domain & Free SSL Certificate.
To avail this amazing price, just use any Hostinger link shared in this article.
To set up web hosting with Hostinger, follow the steps below:
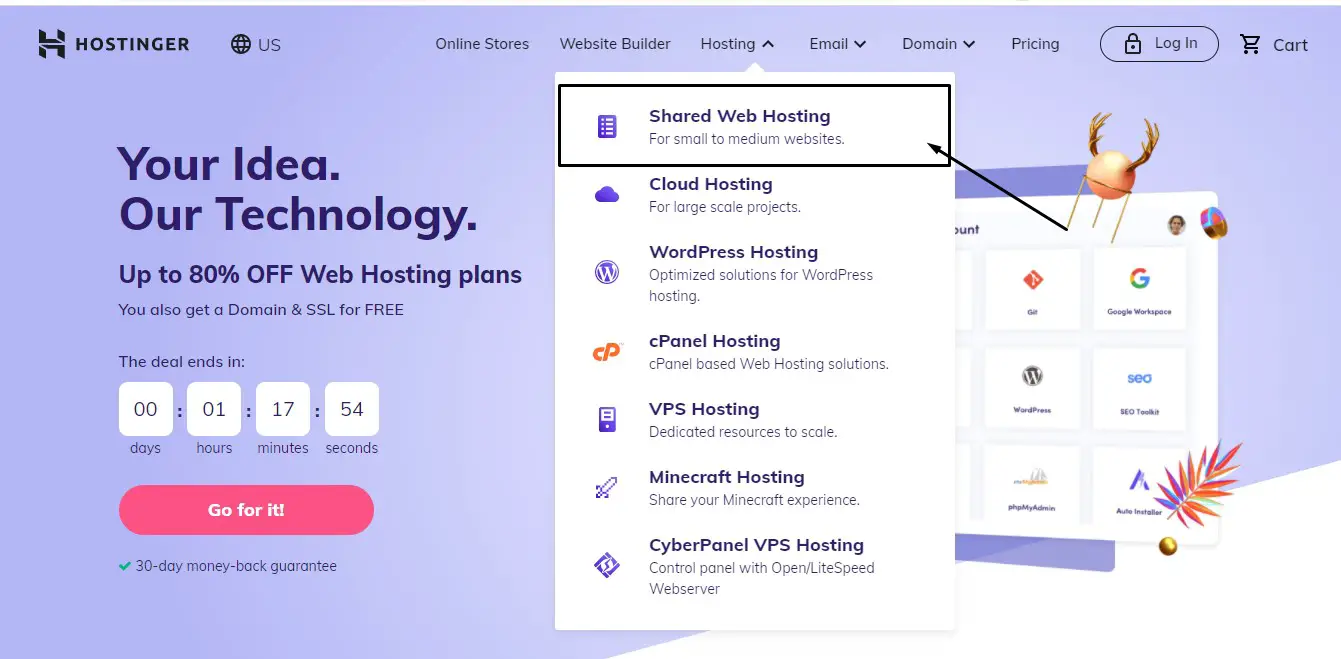
1. Click Here and Then Click on Hosting in the Top Menu:
2. Select Your Hosting Plan:
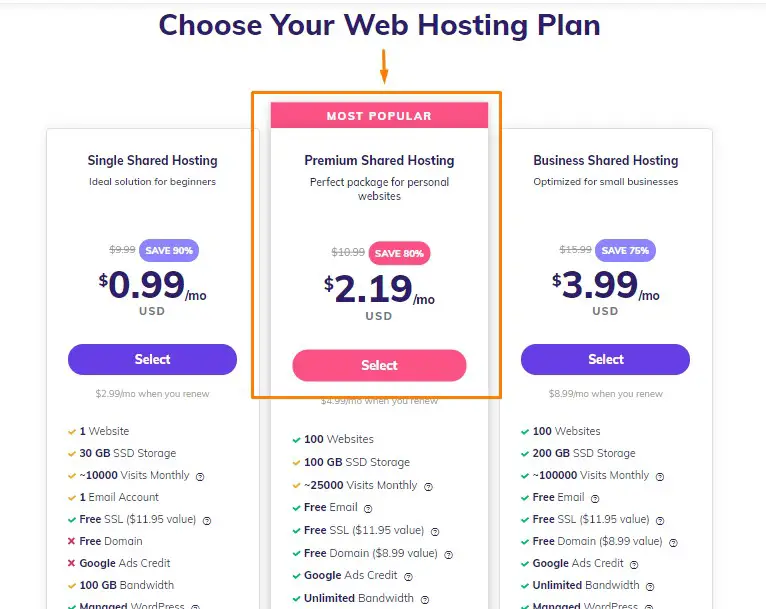
Which plan should I select?
I would recommend you to select the “Premium Shared Hosting” plan which is highlighted in the image above.
You will get a Free domain and a Free SSL certificate with this plan. You can also host up to 100 websites with this plan so if you want to start multiple blogs in future this would be the best plan.
In comparison to the Single shared hosting plan, the Premium Plan offers more benefits and resources at more affordable rate.
I use the premium plan for hosting all of my blogs and this has been super affordable and convenient for me.
3. Choose Your Package:
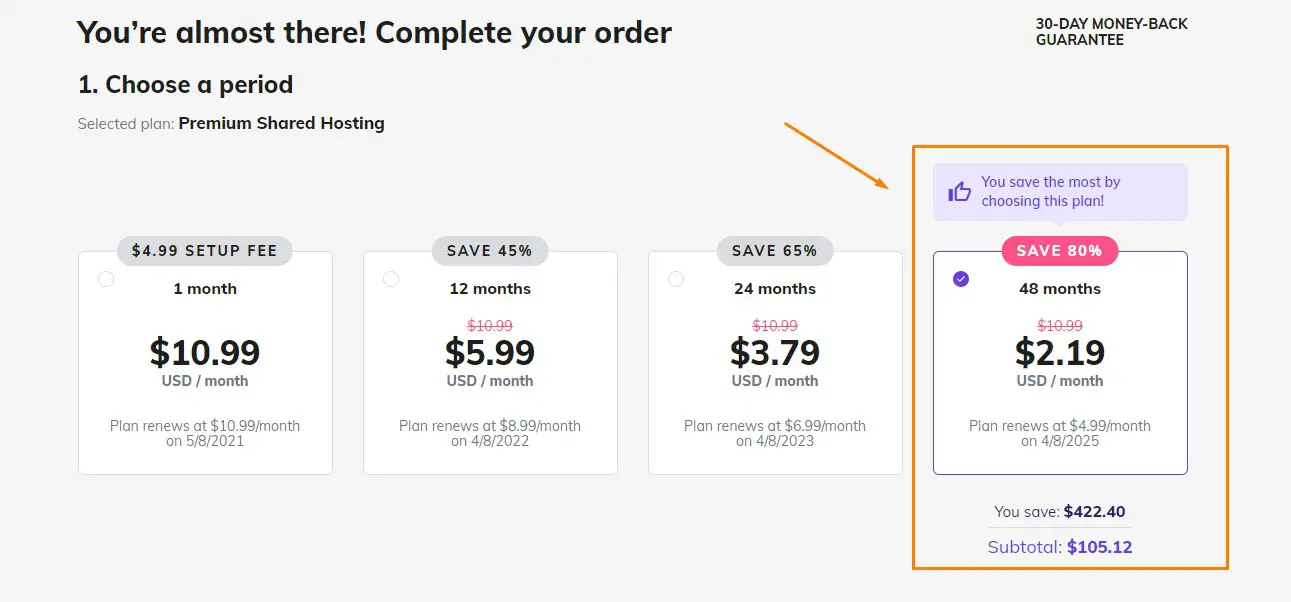
This is where you have to select your package. I would recommend the 48 months plan because it is the most affordable one and this plan would stay active for 4 years.
So you will not have to pay again for hosting for the next 4 years!
If you want to save money in the long run, I would suggest you choose the 48 month plan for $2.19 a month.
You can also pick from the other three options is you like. But according to the calculation, the 48 month plan is the most affordable one in the long run because you are saving 80%.
4. Create Your Hosting Account
Enter the email address which you will use to sign into your Hostinger account. You can also create an account using facebook, google or github.

5. Enter The Details For Payment
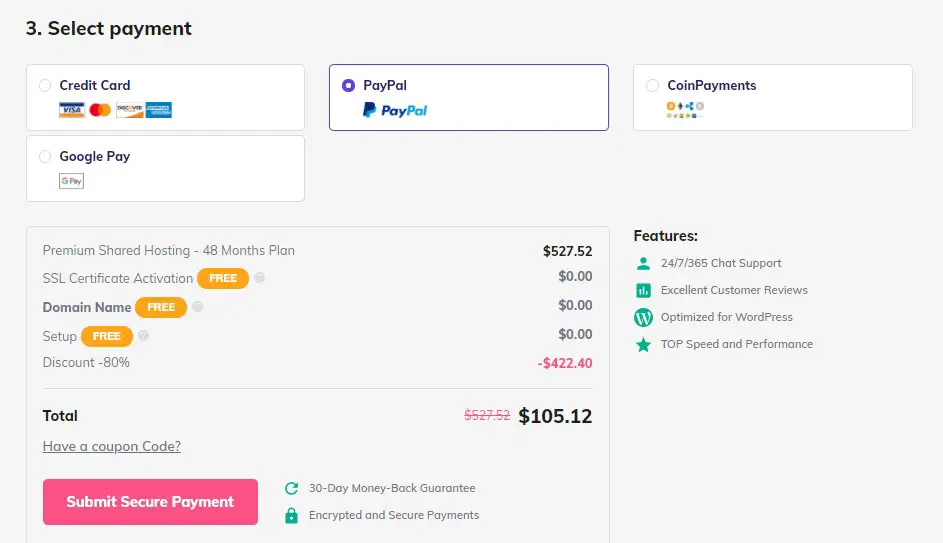
This is the final step.
Choose your payment method and enter your details. You can choose from different payment options provided by Hostinger which are paypal, google pay, credit card, coin payment.
Once you select the payment option, click on submit secure payment and pay for the hosting package.
Hostinger may ask you to choose your free domain right now or at a later stage. You can choose your domain that you have decided in the previous step.
Once your account is created and payment is done, you will be able to log into the hosting account you have just created with the email you have used.
6. Congratulations! You have setup your own blog!
Here’s how your Hostinger dashboard will look:
Step 4: Set Up WordPress on Your Blog
Now it’s time to setp up wordpress on your blog.
What is WordPress?
WordPress is the Content Management System that is the best one out their for websites and blogs.
It is super easy to use and beginner friendly. You will easily learn how to use wordpress and design your blog.
Just follow this quick and easy steps to install wordpress on your blog:
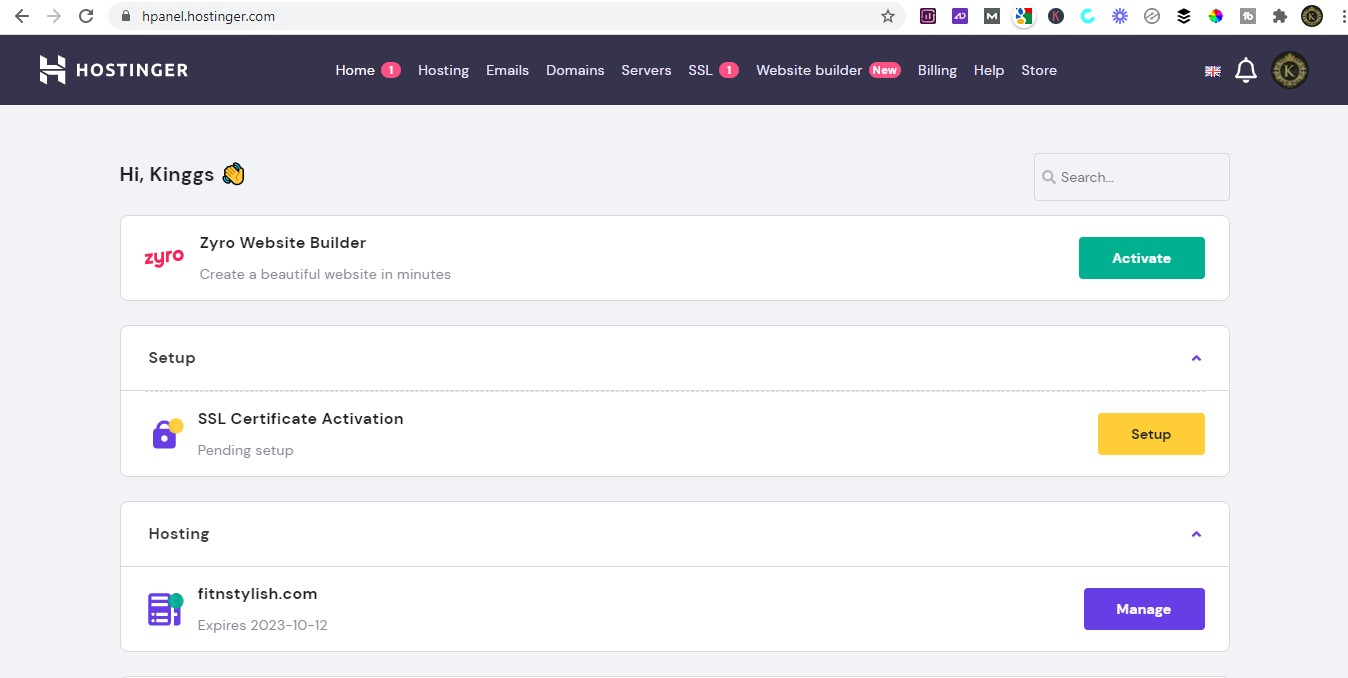
- Click on the manage button in front of the domain name in your dashboard:

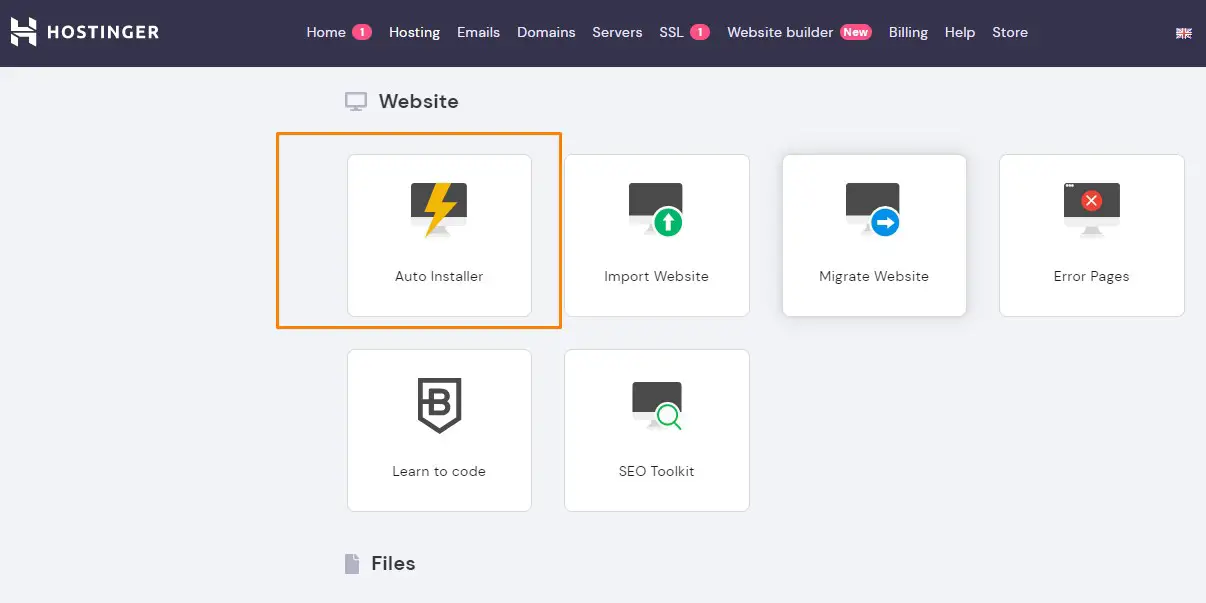
2. Next, you will see lots of options and applications. But scroll down till you see the website section and under that, click on “Auto Installer“. (As highlighted in the image below)
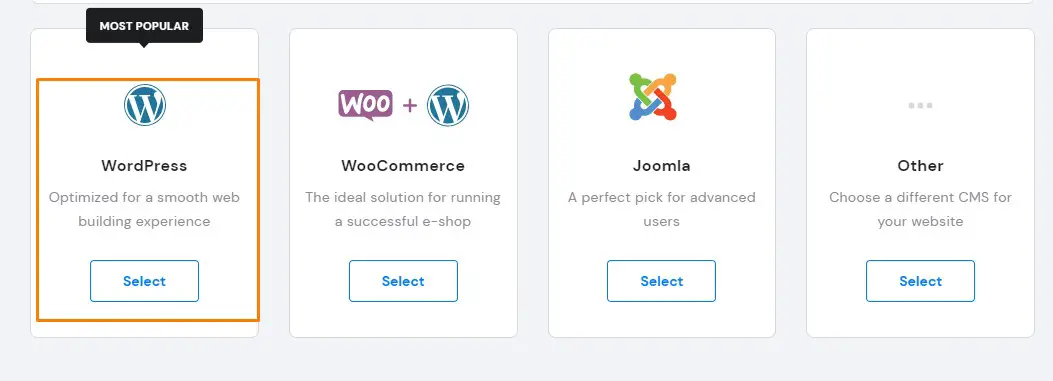
3. A new page will open. Now click “Select” under “WordPress”
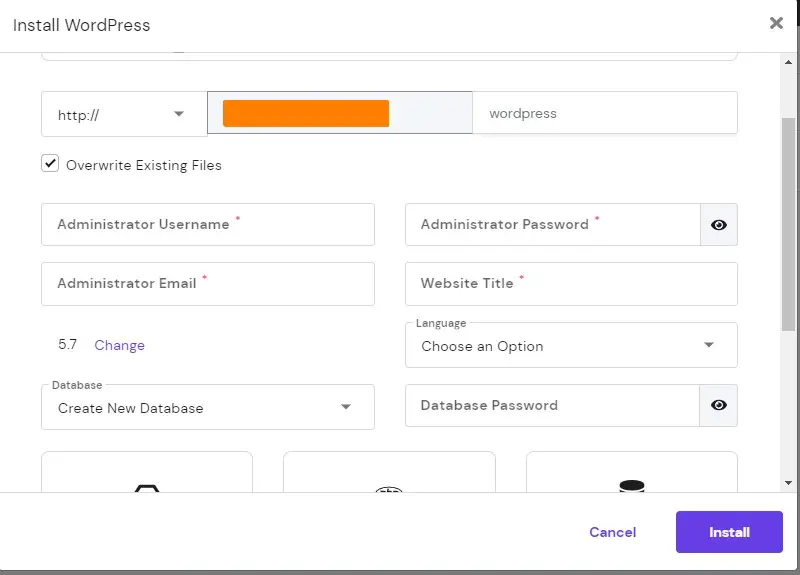
4. Now fill the details. Enter the domain name in the column in front of http. Next add the username, password, email and website title for your blog. Select your language and click on install.
Now, WordPress will get installed on your blog.
Once WordPress is installed, you will have to login to your wordpress dashboard. To do this, simply enter /admin at the end of your domain.
For example, enter “www.yourblogname.com/admin” and this page will be opened, where you will enter your username and password that you have created in the previous step.
After logging into your wordpress dashboard this is what you will see.
Now, simply, take the mouse pointer to “Appearance” on the left side and click on “Themes”. (See image below)
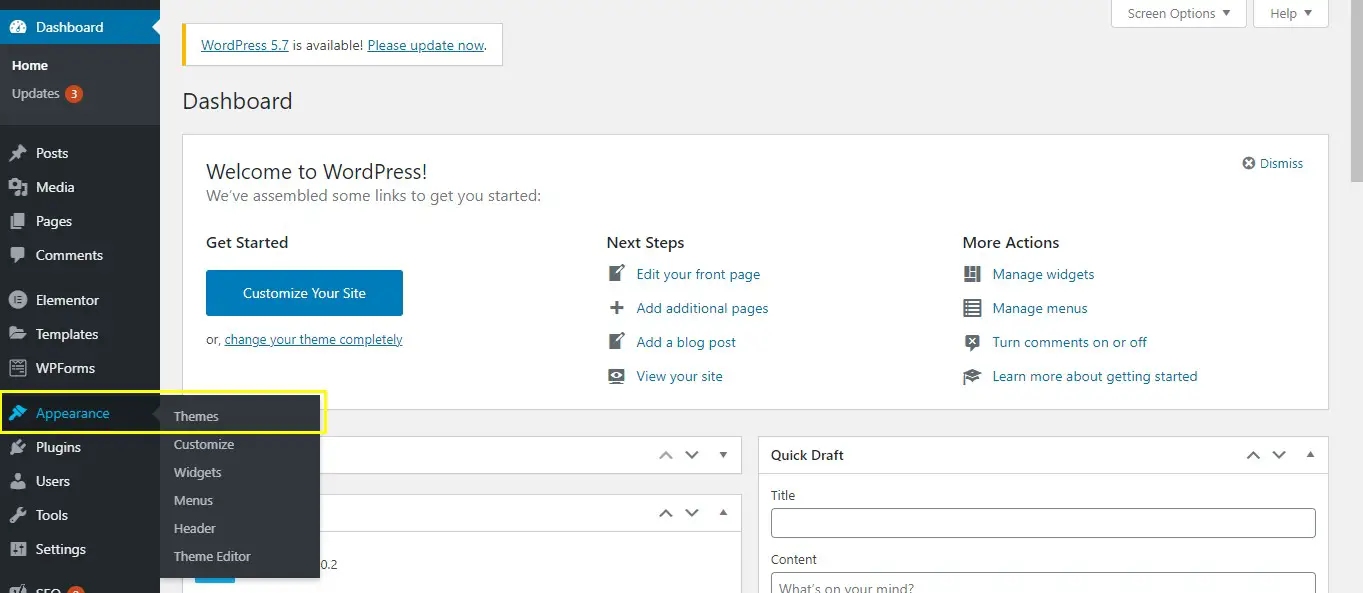
You can choose free themes offered by wordpress. I prefer to use Astra & OceanWP Themes for my blogs as these are lightweight and increase the site speed.
You have setup your blog successfully! Congrats on following along and taking the right step of starting your own blog.
Now what should you do next?
Step 5: Write Content & Monetize
Now is the time to write blog posts, and lots of them.
I would suggest you write 7 to 10 blog posts and then start promoting it on Pinterest.
Pinterest would help you get traffic to your new blog and help in building your audience.
Then, you will be able to monetize your blog using display ads from AdSense or Ezoic. (I use Ezoic to show ads on my blog, and I highly recommend them)
If you already have a blog and want to monetize it, then check Ezoic. They are one of the best alternative to AdSense because they can increase your earnings.
You can also use affiliate marketing to earn money from your blogs.
Their are multiple ways to make money blogging, but first you need to have a solid library of blog post so that your readers can stay on your blog for longer and read them.
So begin with writing many blog posts!
Get Free Blog Set-Up
Do you want to start your blog but don’t want to go through all the process of setting it up?
If you are completely new to blogging, you could feel overwhelmed by all the process. But you don’t have to worry, I have got you!
You can claim your free blog set-up service, and I will set up your blog so you can start writing content without having to worry about the technical blog set-up.
Here’s how to claim the free blog set-up service from me:
1. Purchase your web hosting package from Hostinger, using any of the links shared in this post or use this link to sign up for hostinger.
You will get the hosting service for just $2.19 a month along with the FREE domain and SSL certificate (worth $25) if you sign up using my special link.
2. Next, forward your receipt at [email protected] and inform me that you want to claim this service.
3. Once you email me with the receipt, I will share all the details to you via email and you’ll get your amazing new blog delivered within 48 hours.
Please Note:
This blog set up service is available to you only if you purchase the Hostinger package through my link.
If you already have a hosting package and still want to get your blog set up and designed by me, please email me at [email protected] and we’ll offer you custom package.
Also, this is a one time service which means once I set up your blog, I will not be available for additional theme/technical support once blog set-up is complete and I hand over your blog to you.
Conclusion: How to start a blog
Here’s the recap on “How To Start Your Blog”:
- Choose your niche
- Choose your blog name (domain)
- Register your domain and hosting with Hostinger for $2.19 a month
- Install WordPress on your blog
- Write content and monetize the blog
Starting your blog is easy, but you need to work and put efforts if you want to make it a real source of income.
It’s not a get rich fast scheme. You have to put the right strategies and learn from those who have already made their blog successful.
But once you do work on it, it can become one of the biggest income source that you can imagine.
You have to treat it like a business and do worthy investments like domain, premium hosting and dedicate lots of work and time.
Comment below or email me if you have any doubts and I will do my best to help you set up your own blog to make money.
Blogging Tools & Resources That I Use & Recommend:
1. Hostinger: To host all my blogs. You can get hosting for $2.19 a month and free domain and SSL certificate if you use my link here.
2. Ezoic: To display ads on my blog and earn money. Check them here.
3. Secret Sauce To Skyrocketing Your Blog Traffic (Ebook):
I learnt traffic generating strategies from this ebook. I would highly recommend this if you want to learn about increasing your blog traffic and earning your income.
4. Pinterest Templates:
I promote my blogs on pinterest and use pinterest templates. This helps in saving time and making multiple pins to get more traffic. Check these beautiful templates here which you can use for promoting your own blog.
5. Blogging Bundle:
This is for those who want to start a blog or want to grow their blog. You will get a printable blog planner, holiday traffic secret ebook and blog traffic ebook in this bundle. Check this bundle here.
6. Pinterest Traffic Ebook: Get Paid to Pin
This ebook will show you the strategies to get free traffic to your blog using pinterest. I use pinterest to get 22,000+ pageviews everything.
Make sure to join my free blogging course where I’ll guide you step by step to start your blog and make money from it. Click here to join my free blogging course and you’ll get instant access.